My First Real Cigar Box Build
I've wanted a decent cigar box guitar for a long time now. About a year before Covid I came across a Youtube video of Justin Johnson playing Ace of Spades by Motorhead on a cigar box style guitar made out of a shovel. I instantly became fascinated with cigar box guitars.
Shortly after that I found an inexpensive kit on Amazon. It was a small fretless design, easy to put together, and affordably priced. Honestly, it wasn't much of a kit, for the most part, you just strung it and played. There was very little assembly required. At the time I think I spent under $30 for it. For the price it was a really fun little guitar. I still have it and play it often.
Being fretless, it wasn't the easiest guitar to play. For the most part, you have to rely entirely on the slide. Not being a slide player, it forced me to use the slide. It didn't take long before I was getting some interesting sounds and little ditties out of the guitar. I'm not going to say they sounded good, but I learned the basics of playing slide and it helped a lot in my regular slide guitar playing.
On a side note, if you're looking to learn slide, A CBG (cigar box guitar) isn't a bad learning tool. You can focus on 3 strings, and because of the tuning, DAD or EBE or most other tunings, the bottom string and the top string are usually the same note just a different pitch. So you really only have to learn two strings.
OK so I learned the basics of cigar box playing using the cheap blues box kit. What I could learn was limited without frets. I kept finding tutorials, that relied on both slide and fretting. I needed a fretted guitar.
I've wanted a fretted cigar box for a really long time. I started researching them, and thought about buying one off eBay. However, I felt in keeping with tradition, I should build it myself. Obviously, you don't have to build one yourself, but I just felt like I wanted to.
I then ordered all the parts I needed to build a cigar box guitar but had no idea how to put it all together. Honestly, I could probably figure it out, but it was about $75 worth of parts, I have no woodworking skills AT ALL, and I just didn't want to learn by trial and error. I could easily see this becoming a $150 + project with mistakes and repairs. My solution, find a kit with detailed instructions. This way I can learn while I build.
StewMac Had What I Needed.
Researching several companies it boiled down to 2. StewMac or CB Gitty. After ordering some budget tuners from Stew Mac for a restoration guitar project I did over the summer, I decided on buying from them. I was happy with the tuners, and the kit seemed like quality stuff too. There was also a truss rod in the StewMac kit for the neck. The CB Gitty guitar didn't have a truss rod. I decided on the StewMac kit because it just looked like better quality.
Why A Kit
I went with a kit for several reasons. 1) I'm not a woodworker or "luthier" as they call instrument builders. 2) My tools are limited to motorcycle and car tools, not much for woodworking. 3) I didn't want to build some ratty looking thing, I wanted a polished finish. I figured a kit could accomplish that. 4) Finally, I wanted some detailed instructions.
Instructions
I'll start with the instructions. The kit comes with a detailed booklet. It covers everything you need for the build right down to paint and finish. To me, the instructions and step by step process were priceless and worth the price of admission.
When it came to wiring, I wish there would have been more pictures. I'm not proficient in wiring and diagrams, so more pictures would have been nice. I did manage to Forest Gump my way through the electrical issues though and actually got it to work on my first attempt. I was really worried about wiring it.
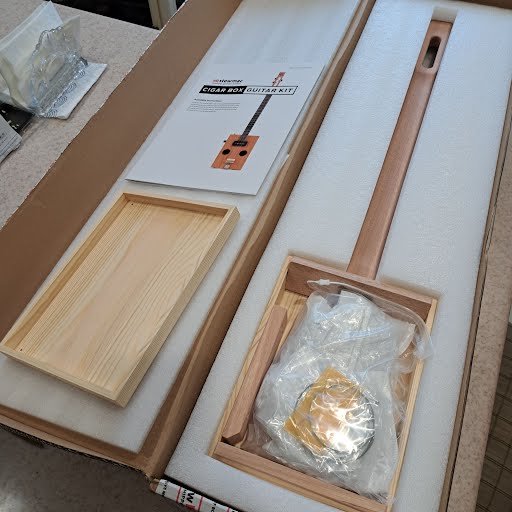
Parts and The Kit Itself
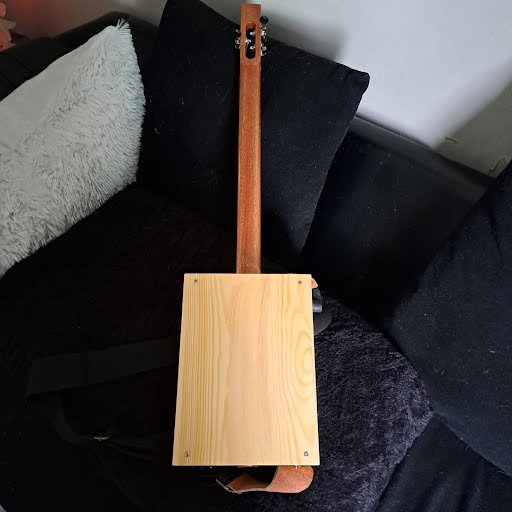
Going with a kit, all the hard stuff was already done. Many of the holes were pre-drilled. The neck came fretted. The box had the sound holes and pickups cut out already. Without proper woodworking equipment, this was a real time saver, and also insured a decent end result IMHO.
There was a lot of drilling and sanding. Basically, they send you an unassembled, unfinished guitar. You do the rest as far as how you want it set up, and the type of finish you want. They also have some basic set up instructions for slide players and fret players briefly explaining the difference. I opted for something in between the two as I play both styles.
Quality of the Kit
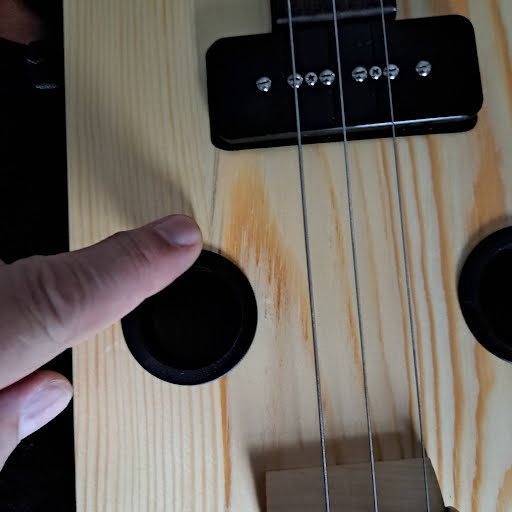
For the most part I was pretty impressed with the quality of the kit. Everything appeared well made. The neck and truss rod system were pretty impressive. You don't find truss rods on many cigar box builds. Besides insuring the neck stays straight, the truss rod is nice for dialing in your string action.
You can see the truss rod peaking out of the center. The tuner grommets were also really awkward and difficult to get in. My fingers are to fat for such things. 🤣
I was a little bummed to find a crack in my box top between the pickup hole and sound hole. That was really disappointing. I thought about returning it, they were pretty big cracks, but decided to just get some wood filler from the hardware store instead of dealing with returns and having to wait another week to get started on the project. The cracks were a little disappointing though. I mean if I wanted cracks, I could do that myself! This was exactly why I ordered a kit. So I wouldn't have to deal with stuff like this!
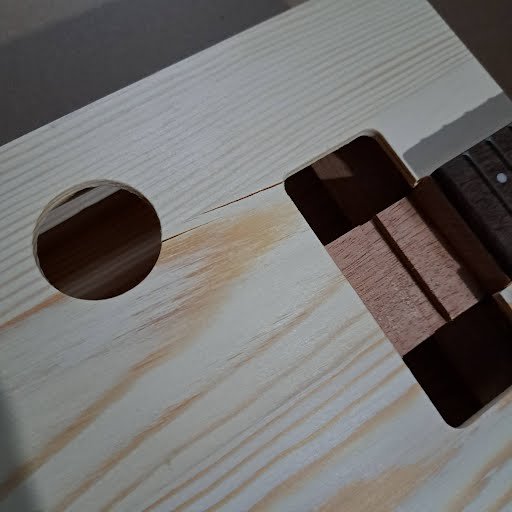
Besides the crack, who knows maybe it happened in shipping. I'd blame quality control on that though. The rest of the stuff seemed like good quality. Naturally I got the one box top with a crack in it.
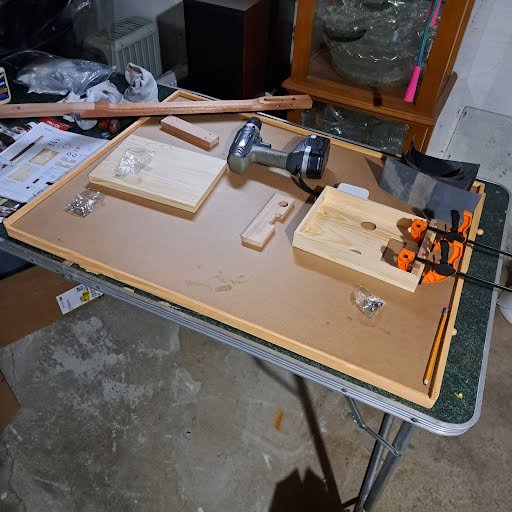
Prep and Build
A huge portion of the build was prep work. I read the instructions several times before starting. I checked the neck with a metal yardstick to makes sure it was straight. I then lightly hammered the frets to make sure they were all seated properly. (You use a special fret hammer which I purchased. It's more like a tiny rubber mallet.) I then filed down any edges that hung over the side. I used a fret rocker to check for high frets, they all looked good. IMHO the fretboard seemed fine, so I didn't do a lot there. This was all done, per the instructions though.
Next I began sanding the neck and body. I started with 320 grit sandpaper and worked my way up to about 800.
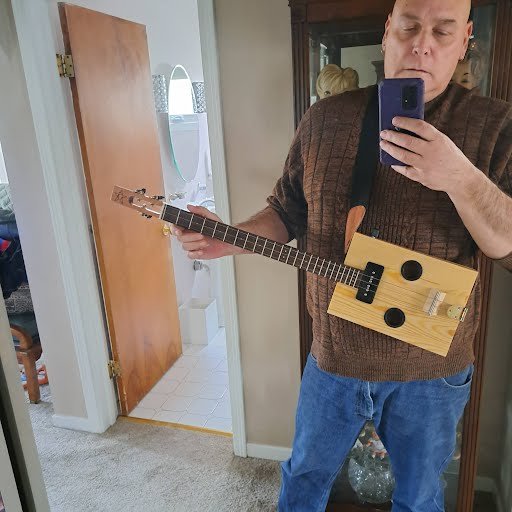
After the 800 grit I started to apply finish. I decided on using Tru Oil for the finish. I liked the natural look of the wood and the tru oil brings out all the natural colors of the wood. I liked the way it came out on the neck. I wasn't sure about the body until I put it all together. I was very pleased with the end result after it was all assembled. Once the oil sets, it looks and feels more like a shellac or gloss finish, rather than an oil. Still nice and smooth, without much resistance while playing. As far as playability, I'm really glad I took this route!
When applying the tru-oil, I started with 600 grit sandpaper and did like a wet sand using the oil instead of water. You apply one heavy coat, wipe off the excess with a clean dry cloth after sanding, then let stand over night to dry. The next day I did 800 grit wet sanding, then 1000 grit, followed by a final dry sand of 3000 grit, the last application was applied with a cloth rag and left to dry overnight.
So prep work took a little over a week. Most of that was about an hour of sanding each night, followed by dry time.
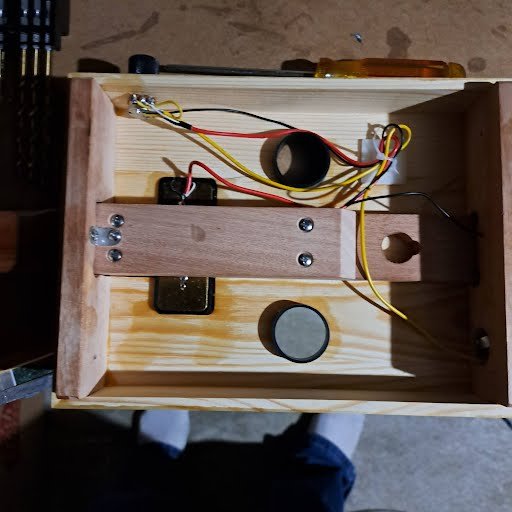
Once the finish is set, it's mostly light drilling, gluing, and a little soldering.
All the screws, nuts, bolts, and electronics are included. I had a small mishap with one of the sound holes, and accidentally cracked it. A little super glue fixed that and it's really not noticeable. That one was on me!
When I got to the electronics, there wasn't a lot there. I had to solder about 4 or 5 connections. I suck at soldering and wish there would have been more diagrams or pictures explaining the procedure. I did manage to Forrest Gump my way through it all though. I was a nervous wreck plugging it into my amp and delighted when I tapped the pickup with my screwdriver and heard it register in the amp! Success!
Once everything was screwed together, glued, soldered, and set up, I let it set over night. After the prep work, it took two days to assemble. That's just because I moved slowly, reading the instructions of each section a few times. Someone with more knowledge and skill could probably assemble it in a single evening.
The following day I strung it up and started playing. For the most part it is finished. Now it's just a matter of playing and fine tuning my adjustments with the bridge, nut, and truss rod. Everything seems to be working fine though.
The only issue I've had so far is the nut didn't take to the glue. The strings hold it down fine though and now at least I can make more nut adjustments, so I'm just going to leave it for the time being.
End Result
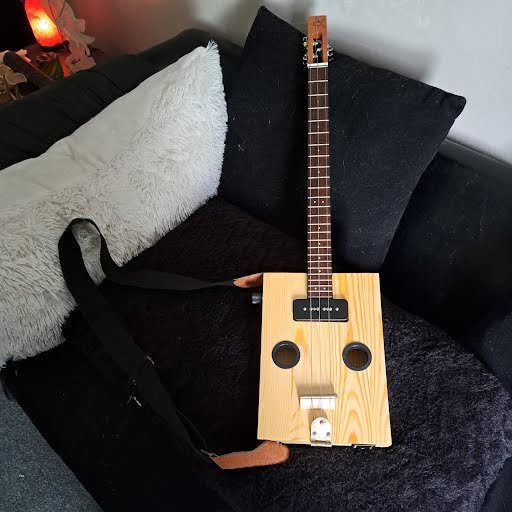
Everything is finished except the bridge. You can see the difference in the wood color. I'll be sanding and adjusting it, so I'll finish it with oil after the adjustments are made. The guitar body was the same color as the bridge so the oil did make a difference in the body too.
I was really happy with the end result. This was a pretty advanced kit and I think I'm confident enough now to do a second build from scratch.
I love the finish of the tru-oil and I'm really glad I used it. I went with Birchwoood Casey brand and it worked great for both the body and the neck. The stuff is generally used for gun stocks but many CBG forums suggested using it as CBG finish. The neck is absolutely gorgeous IMHO.
The body looks good, if I could do it over, I may have went with a darker stain before oiling. Still, I do enjoy the contrast of the light colored body to the darker colored neck. Once it was assembled, I was very pleased with my choice.
I'm still dialing in the setup. It only took about 15 minutes of playing around with some basic setup to get it to sound decent. As I play and I make more adjustments accordingly. I'm really starting to like the sound and feel of the instrument. Each small adjustment seems to improve it.
Likes and Dislikes
This post was more about the build. I'll do a final review after I've played it for a month or so. I also plan on posting some 3Speaks after I get a song or two under my belt. For now, I'll talk about my likes and dislikes of the kit itself.
Dislikes
I'll start with the dislikes. I didn't like the cracks in the body between the sound hole and pickup hole. This was why I ordered a kit, so I didn't have to deal with stuff like this. I could crack the body myself while building. I paid for a kit to avoid these issues
The instructions were excellent, but I wish they would have included more pictures or even a Youtube link showing someone building.. HINT HINT StewMac.
The instructions were thorough, but more pictures would have been nice.
I'm not crazy about the included strings. It will probably be the first thing I change. For now, they'll do.
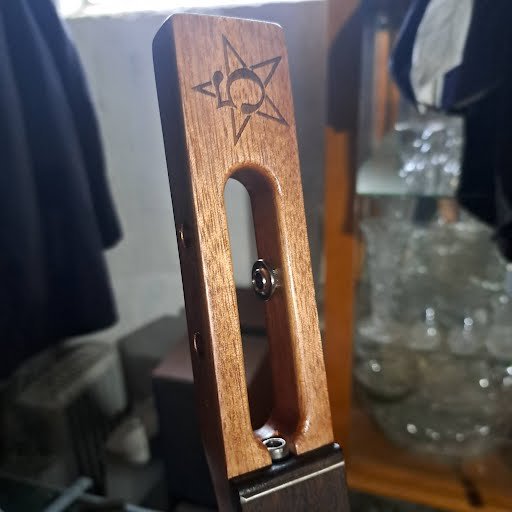
I also wasn't crazy about the way the strings go from the nut to the tuners. They just sort of brush up against the wood. I don't like that design at all. Still the center cut neck, is kind of cool looking and a little different.
Likes
I like the look and feel. As far as cigar box guitars go it feels well made. Not so much my build, but the quality of the materials. IMHO though, the build came out alright.
Between the instructions and the work they did in advance, it wasn't a super difficult build. Reading the Amazon reviews though, many people found it difficult. I'd say this is a more advanced build for most kit builders. It takes time and patience, yet, if you take your time and read through everything, I think most people could get through this no problem. I mean, if I could do it with close to no woodworking or luthier skills, I think just about anybody could.
The pickup sounds great. It plays great for a cigar box. With each adjustment it's starting to sound better too. I'm happy. I finally have a cigar box I built that looks and plays halfway decent. The Dood Abides!
Final Thoughts
If you're not familiar with Stew Mac, they make great stuff for DIY guitar builders and restoration projects. This is my second time ordering from them, and I'll be a repeat customer even with the cracked box they sent me. I'm sure if I wanted to be more patient, they would have replaced it.
If anyone was thinking about a cigar box kit, I'd have no problem suggesting the Stew Mac kit. On a side note, I did see another kit for a paint can resonator from CB Gitty. If I get halfway decent playing this one, I might order that kit down the road, just as a comparison and also another guitar to add to the collection.
Being more confident now, I'm probably going to do another build from close to scratch. I purchased a pre-made neck, everything else will be from scratch. I'll keep you all posted on that.
All in all, I'm really happy I did this. It was a great experience and I'm really looking forward to seeing what I can do with this instrument now. I'll post an updated review in a month or two and tell you all how I feel about playing this instrument after I've had some time to really test it out and get a song or two under my belt.
That's all folks. Time to play some CBG. Thanks for reading.
Awesome work and this definitely deserves a vote!
#freecompliments
Many thanks! Appreciate ya!
You are very welcome and have a great day!
Cool stuff. I've not bought from StewMac, but I've heard they have everything for guitar builders. I have thought about building one from a kit as I don't trust myself to do it all from 'raw' wood, but I need to find the time.
Yours looks great. It's a shame about the cracks, but I guess they cut some corners on quality to keep the price down. Have fun with it and I look forward to hearing it.
!BEER
StewMac is great. It's my second time dealing with them and I was really happy with their quality both times. I bought some "economy tuners" for a restore project and they were awesome. I'll go back for all my parts now.
For some reason, I thought I recalled you built an actual guitar from a kit a couple years back. Am I mistaken?
As far as the cracks, they could have happened in the box too. We had an import business a while back, and wood just cracks sometimes. Temperature and humidity differences can do that. You'd be surprised how unfinished wood warps and cracks as it cures naturally. I just kind of chalked it up to Oh well. The support was still there, so wood filler seemed sufficient.
I'll try and get some playing posted soon.
!BEER
I've never built a guitar. I've just done some minor mods.
Wood can be fickle. It doesn't like change.
LMAO... Yes, that's one lesson I took from all this! #truth
View or trade
BEER.Hey @steevc, here is a little bit of
BEERfrom @the-bitcoin-dood for you. Enjoy it!Do you want to win SOME BEER together with your friends and draw the
BEERKING.View or trade
BEER.Hey @the-bitcoin-dood, here is a little bit of
BEERfrom @steevc for you. Enjoy it!Learn how to earn FREE BEER each day by staking your
BEER.Awesome! I really like the headpiece on that one 🧡
Thanks, it was one of the things I liked about the kit. Definitely a different design for the headpiece from most builds.
Songs which are very beneficial after listening to them, a person gets a lot of relaxation.
A cigar box guitar! I have never had any opportunity to see this instrument in real life and maybe just a few times from a cartoon or movie, a photo. I got a bit more familiar with it now, after your post, though in one moment I imagined if I would get to build a piano 😁 it would take me same time hahaha
I could see a piano being a very difficult build! I couldn't even imagine undertaking that task!
https://twitter.com/lee19389/status/1747013818893647940
#hive #posh