[ESP/ENG] CÓMO OBTENER UNA GRAN MEJORA DE SONIDO EN TU ANDROID (CON ROOT) / HOW TO GET A BIG SOUND IMPROVEMENT ON YOUR ANDROID (WITH ROOT)

Hola Hivers! Hoy quiero mostrarles una gran forma para mejorar la calidad de sonido en sus dispositivos Android a través de dos apps de ecualizadores que me convencieron bastante por las funciones que ofrece.
En este post voy a explicarles paso a paso el proceso de instalación de estas apps y lo que se debe manejar con precaución en estas mismas, aunque también deben tener en cuenta que una de estas apps requiere Acceso ROOT con la aplicación de Magisk, y si no cuentan con esto, pueden seguir el tutorial hasta cierto punto pero es mejor tener todo preparado para una mejor experiencia.
NOTA: Si en cualquiera de los posts que estaré publicando durante este mes llega a recaudar al menos unos 5 dólares, haré el tutorial completo de este post e incluiré el proceso de rooteo del celular que ahí muestro. Y ya lo saben, si tienen dudas o sugerencias pueden dejarlo en los comentarios. Gracias!! 👊
Hello Hivers! Today I want to show you a great way to improve the sound quality on your Android devices through two equalizer apps that convinced me enough for the features it offers.
In this post I'm going to explain step by step the installation process of these apps and what to handle with caution in these apps, although you should also keep in mind that one of these apps requires ROOT access with the Magisk application, and if you don't have this, you can follow the tutorial to some extent but it is better to have everything prepared for a better experience.
NOTE: *If in any of the posts I will be publishing during this month I raise at least $5, I will make the complete tutorial of this post and I will include the process of rooting the phone that I show there. And you already know, if you have doubts or suggestions you can leave it in the comments. Thanks!!! 👊
Now it is... Let's start!
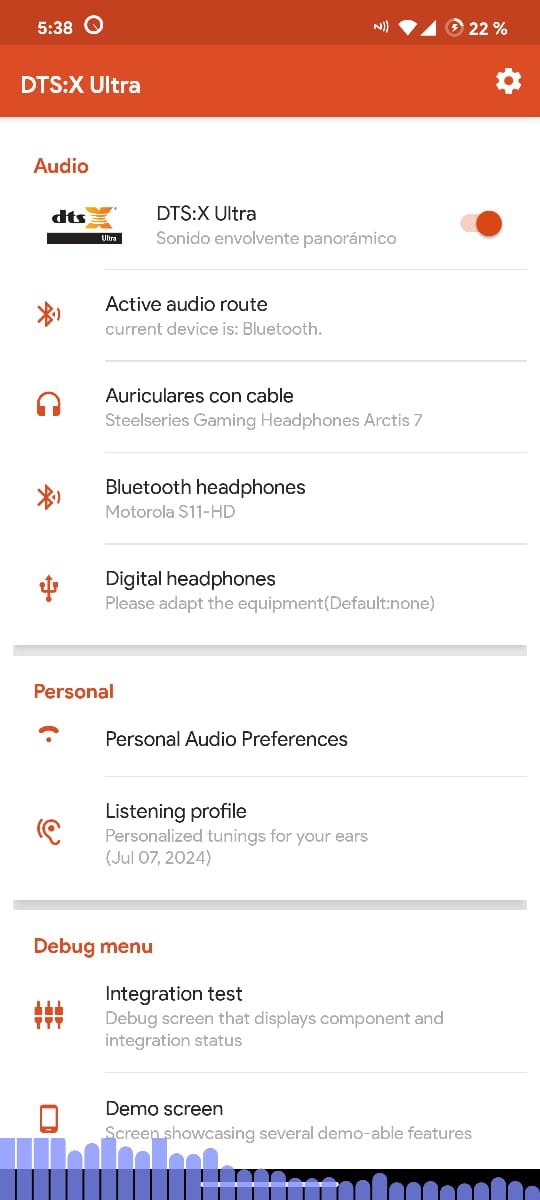
La primera aplicación que descargaremos es DTS:X Ultra. Ésta no solamente mejora el sonido del altavoz interno del teléfono, también puede adaptar configuraciones o "presets" a otros periféricos como audífonos o bocinas ya sean cableados o inalámbricos (Bluetooth), aunque también recomiendo usar periféricos de audio cableados que ustedes consideren que tengan una buena calidad de sonido, debido a que existe una configuración personalizada para estos que puede mejorar los valores de decibelios para cualquier dispositivo de audio.
The first application we will download is DTS:X Ultra. This not only improves the sound of the phone's internal speaker, it can also adapt settings or "presets" to other peripherals such as headphones or speakers either wired or wireless (Bluetooth), although I also recommend using wired audio peripherals that you consider to have a good sound quality, because there is a custom configuration for these that can improve the decibel values for any audio device.
Cabe destacar que DTS no se instala de la manera convencional que ya conocemos, sino como módulo root de Magisk. Nos dirigimos a este enlace.
Luego nos ubicaremos en la sección de "Files" y seleccionamos la última versión de DTS
It should be noted that DTS is not installed in the conventional way we already know, but as a Magisk root module. We go to this link.
Then we will go to the "Files" section and select the latest version of DTS


Después de descargar el archivo (en .zip) nos dirigimos a nuestro administrador de Magisk y buscamos la sección de "Módulos" para luego seleccionar "Instalar desde almacenamiento interno" y ubicar nuestro paquete de DTS. Cuando el sistema avise que se completó la instalación, procedemos a reiniciar nuestro dispositivo.
After downloading the file (in .zip) we go to our Magisk manager and look for the "Modules" section and then select "Install from internal storage" and locate our DTS package. When the system says that the installation is complete, we proceed to reboot our device.


Bien, después del reinicio encontraremos la aplicación instalada, así que ingresaremos a ella.
Well, after the reboot we will find the application installed, so we will enter it.

Ahora nos encontraremos con múltiples funciones, desde elegir modos de audio de varios audífonos para aplicarlos a los tuyos si los quieres conectar; hasta configuraciones para aumentar el refuerzo de graves del sonido. También trae un ecualizador gráfico pero les recomiendo no activarlo porque no está tan pulido y provoca disminución del sonido en música con muchos bajos.
Now we will find multiple functions, from choosing audio modes of various headphones to apply them to yours if you want to connect them; to settings to increase the bass boost of the sound. It also comes with a graphic equalizer but I recommend not activating it because it is not as polished and causes sound reduction in music with a lot of bass.
Activen el programa DTS: X Ultra con la primera opción, conecten unos buenos audífonos de cable (si son gamer, mejor), y diríjanse a la opción "Auriculares con cable". Ahí buscarán el modelo audífonos que están usando o simplemente elijan el que más les convenga. En mi caso, estoy usando unos de marca "Gaming Weapons" y en la app seleccioné los Steelseries Arctis 7.
Activate the DTS: X Ultra program with the first option, connect a good wired headset (if you are a gamer, the better), and go to the "Wired headphones" option. There you will find the model of headphones you are using or simply choose the one that suits you best. In my case, I am using a "Gaming Weapons" brand and in the app I selected the Steelseries Arctis 7.

Ahora viene un paso importante, regresen a la pantalla principal de la app y busquen la opción "Listening Profile", en donde harán una calibración del sonido de sus audífonos cableados para que luego el sistema lo aplique a todos los dispositivos de sonido. Sigan las instrucciones y traten de escuchar lo mejor posible.
Now comes an important step, go back to the main screen of the app and look for the "Listening Profile" option, where you will calibrate the sound of your wired headphones and then the system will apply it to all the sound devices. Follow the instructions and try to listen as well as possible.
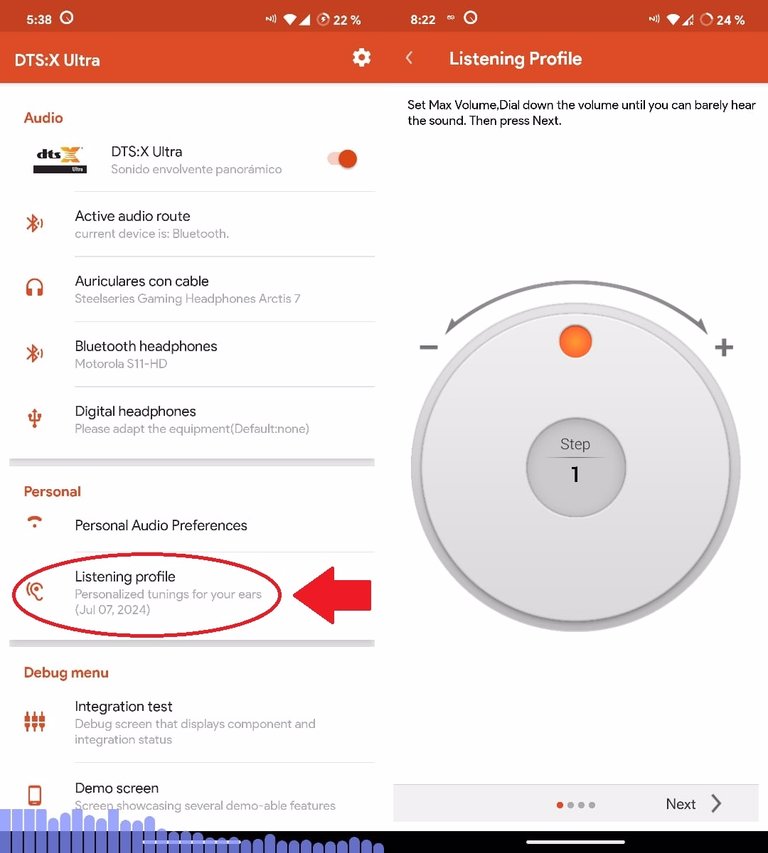
Configure el volumen máximo, baje el volumen hasta que apenas pueda escuchar el sonido. Luego presione "Siguiente".
Después de concluir, pueden conectar cualquier tipo de periféricos de sonido y elegir el modelo que ustedes gusten, les recomiendo el perfil de los Motorola S11-HD para audífonos Bluetooth. Si sienten que después de la calibración de sonido (Listening Profile) no hubo ningún cambio, puede ser que el perfil de calibración no esté seleccionado, así que vuelvan a la pantalla principal y busquen la sección de "Demo screen" y activen la primera opción que dice "User Setting:".
After that, you can connect any type of sound peripherals and choose the model you like, I recommend the Motorola S11-HD profile for Bluetooth headphones. If you feel that after the sound calibration (Listening Profile) there was no change, it may be that the calibration profile is not selected, so go back to the main screen and look for the "Demo screen" section and activate the first option that says "User Setting:".
A continuación, descargaremos la aplicación de SpotiQ Ten desde la PlayStore. Es un ecualizador sencillo de usar que contiene 10 bandas y mejora notablemente la calidad del sonido.
Next, we will download the SpotiQ Ten app from the PlayStore. It is a simple to use equalizer that contains 10 bands and greatly improves the sound quality.

Ahora la abrimos y configuramos las bandas a nuestro estilo. Les sugiero posicionarlas como lo hago en la siguiente imagen. Este preset es muy bueno para música, películas o juegos. También pueden manejarlo a su manera pero traten de no llevar una banda al nivel máximo porque el sonido puede saturarse o distorsionarse.
Now we open it and configure the bands to our style. I suggest you to position them as I do in the following image. This preset is very good for music, movies or games. You can also handle it in your own way but try not to take a band to the maximum level because the sound can be saturated or distorted.

Utilicen el botón "+" para guardar su perfil con un nombre. Pueden seleccionarlo a través del botón "Not Saved".
Use the "+" button to save your profile with a name. You can select it through the "Not Saved" button.
Tengan en cuenta que si compran la versión Pro, pueden acceder a más funciones como el limitador o el inicio automático de la app al arrancar el dispositivo.
Please note that if you purchase the Pro version, you can access more features such as the limiter or the automatic start of the app when starting the device.
Muchas gracias por leer, espero que este tutorial les haya servido. Recuerden apoyarme para seguir compartiendo con ustedes el mejor contenido. 💪
Hasta luego!!
Thank you very much for reading, I hope this tutorial has helped you. Remember to support me to keep sharing with you the best content. 💪
See you later!!!
Congratulations, your post has been curated by @dsc-r2cornell. You can use the tag #R2cornell. Also, find us on Discord
Felicitaciones, su publicación ha sido votada por @ dsc-r2cornell. Puedes usar el tag #R2cornell. También, nos puedes encontrar en Discord